Thursday, December 27, 2012

Geometry ISN

Since I started using an ISN in my Algebra class I have seen my students succeed to higher levels/expectations than I ever thought were possible at the beginning of the year.  In the mean time I saw the levels of my Geometry students progressively drop as the semester was going by.

At the beginning of every period I ask my students a journal question in which they are to reply to, we use blogger for this.  One day I asked my Geometry students to reflect on their learning and the type of student they are.  These are the following questions I asked them:
  • What do you need to do as a student in Geometry class to be successful?  
  • What have you been doing so far this school year that hasn't been working for  you?  
  • What have you been doing so far this school year that is working for you?   
The number one thing my students replied with was they don't know how to take proper notes and they lack organizational skills.  It was like the clouds opened up and the sun was shining down on us that day.  I instantly knew that they desperately needed the ISN too.

That night on my way home from work I stopped by my favorite store, Target, and picked up composition notebooks for each of my Geometry students.  The next day when the kids came in and saw all of the supplies out on the table some were excited because they have friends in my Algebra class and knew what was going on, while others were just plain old confused.

I explained what we were doing and why we were doing this.  They were all excited to try something new.  In fact at the end of the period one of my students approached me and said "Ms. O this is a pretty cool project you have us working on."

This is the cover I created for my Geometry ISN.


Numbers Important to Me! Numbers Important to Me! #2

Sunday, December 9, 2012

Solving Linear Equations

The last pages in our ISN before my students took their first big test, after starting the ISN, was on Solving Linear Equation with Variables on Both Sides of the Equal Sign.  I wanted to do a foldable that I had seen used in a science class before, it's call the Layered Book.

The only thing different is that I don't glue the pages together we just staple them at the top. 

 This foldable gave us a tab for each of the five steps and space to solve the sample problem.  To create this I took 3 different colored sheets of paper and cut them in half (profile direction). I had them already pre-grouped for the students so when they came in all they had to do was pick which color combination they liked.

We started off titling it, then putting our first step on the tab, along with the sample problem on the distribute tab.  We continued until we were finished.  We performed each step  when we were on that tab.  We rewrote the simplified equation on the next tab and performed the next operation.

On the right hand side I gave the the students a few sample problems for us to work out together.  Then a sheet of problems they had to complete on their own.  They taped the page over our worked out problems (like a flap) so that they could still see them and use them as reference as they completed theirs.


**Proud Teacher Moment**

A day or two later I gave my students their first test on Solving Linear Equations.  We went from one-step equations all the way to what you see above.  I gave it to them the day before we went on Thanksgiving Break, and I was terrified to grade them in fear they would not do as well as I had hoped.  So I waited until Sunday evening before I went to bed to grade them, and I couldn't have been more proud of my kids.

The LOWEST grade was an 89%, I almost cried.  On Monday when I passed back their tests they were pretty proud of themselves!

Sunday, December 2, 2012

Liebster Award

Thank you to Stacy from http://new-in-room-202.blogspot.com for nominating me for the Liebster Award!  The Liebster Award is given by other bloggers to up and coming new bloggers who have less than 200 followers.  It is to show new bloggers that they are appreciated and to help spread the word about their new blogs.  I hope that sharing the news about some of these "newer" blogs helps them get more followers!
Here are the rules:
-You must post 11 random things about yourself.


-Answer the questions that the nominator set for you.


-Create 11 questions for the people you nominate.


-Choose 11 blogs you love (with less than 200 followers) and link them in your post.


-No tag back (but please leave me a comment on this post with the URL to your Liebster post so I can learn more about you!


11 Random Facts about Me

1. Target is my favorite store.

2. I am  cranky without my caffeine.

3.  I love my dog Emma to death.
4. I hate when people eat with their mouths open.

5. Fall is my favorite season.

6. Cheesecake Factory is my favorite restaurant.

7. My desk at work always starts and ends clean, however during the day it can never be found!

8. I have been in 3 car accidents, none of them my fault.

9. I love to cook, but hate doing it for only 2 people.

10. Dishes are the most annoying choir that could possible exist.

11. I use to work for the Chicago White Sox.


11 Questions From my Nominator

1.  Why did you start blogging?  I started blogging as a way for me to do some professional reflection on the way I teach and the activities I do in my classroom.

2. How long have you been blogging? I have only been blogging since September 30th, 2012.
3. What's your favorite post that you've written? I would say my post on starting Interactive Student Notebooks, it also happens to be my most popular post.  

4. Any pets? I have 1 dog, 2 cats, and a lizard.  Unfortunately my snake named Stanley passed away the other day :(
5. Favorite vacation spot? I haven't been on to many vacations, but my most favorite one so far has been Las Vegas.

6. Favorite TV show? Bones on Fox, LOVE IT!

7. Fears? Spiders and any other little creepy crawlies.  

8. Celebrity you resemble most? Personality wise I would say Melissa McCarthy, appearance wise...None.

9. Favorite quote?  "Fairness doesn't mean that everyone gets the same. Fairness means that everyone gets what they need to succeed" 

10. Wine or beer? Beer
11. Thoughts on country music? I'm not a big fan, but since I teach at a school that is in the country you are pretty much exposed to it on a daily basis.  It grows on you.

11 Questions For my Nominees:
1. How frequently do you blog?
2. What is your favorite type of food?
3. If you could have 1 thing in this world what would it be?
4. If you could live anywhere, where would it be?
5. What is your all time favorite movie?
6. What is the best way to spend a Saturday Night?
7. One regret you have in life?
9.  Favorite Book?
10. Job/Career?
11. Family Members?

Nominees

Distributive Property

Before Thanksgiving I introduced the distributive property to my Algebra kids and we created our next ISN pages (7 and 8 for those keeping track).

I gave each of my students a strip of teal paper and we folded it half and then in half again.  We wrote Distributive Property on the front.

On the inside of the folded paper it shows all of the different forms of the distributive property using both positive and negative integers.

I'm not all that impressed with this one, and it's something I'm considering changing for next year but in the end it did it's job.

Underneath the fold-able we talked about where this step would fit into our order of steps for Solving Linear Equations and listed our new set of steps underneath it.

On the right page we defined the distributive property up at the top and highlighted the word.  I then gave them 3 basic Distributive Property problems, for example 3( x + 4).  Had them highlight where they saw the Distributive Property, then work it out.


I then gave them 2 equations that contained all 4 of their Solving Equation steps.  Again the students had to highlight where in the problem they saw the distributive property and then work it out.  The students where then given a half sheet of paper that contained problems on it that they taped over their class practice, like a flap so they could still lift the paper up to see the practice problems.  They again had to do the highlighting and solve.  Below are the problems I gave them on the half sheet.

**UPDATED PICTURES OF THE RIGHT SIDE**


Sunday, November 25, 2012

Two-Step Equations

After creating our one-step equation pages in our ISN we moved on to two-step equations.  I didn't want to create another fold-able for this because I knew I was going to need one for multi-step equations with variables on both sides of the equal sign and I didn't want them to lose interest in fold-ables.

Instead we did this.
These are pages 5-6

I gave them two different types of problems, one with a coefficient (either fractional or whole number, if it's a fraction we don't multiply by the reciprocal we just simply divide by the fraction, keeps the number of different types/steps to a minimum) and one problem where the variable is the numerator of a fraction.

The problems went at the top of the page and each student was given a pink and green piece of paper as well as a pink and green highlighter.  We wrote step 1 in the pink box and step 2 in the green box.  We worked out the two sample problems showing only step 1 in the pink box and step 2 in the green box.


At the bottom we showed how to check our work.  On the right hand side I gave them four problems.  They had to highlight the first step in pink and the second step in green.  After they found the answer they were expected to show their answer checked next to each problem.

These pages were effective for my students but I think next year I will change it up.  I was having a hard time trying to come up with something to do for two-step equations that wasn't a fold-able.  I will say I did notice students using the pink and green highlighters on their homework and our other classroom practice.

Sunday, November 18, 2012

Math Puzzle

Every student needs practice with the content that you teach, especially in math.  However, I think sitting there doing a typical worksheet is boring, and the students think so too.  Whenever a worksheet is passed out I can hear the sighs of disappointment in the room.

But what can you do when all they need is practice...

I created this puzzle for my students to practice solving equations with variables on one side of the equal sign.

My classes are small but I always make at least 10.


I copied them onto colored paper (it makes it easier to know which puzzle they below to when a piece gets lost), laminated them, cut them up and clipped them.


A students start to the puzzle
 Students worked the problems out on a separate sheet of paper and when they find the answer, the piece bumps up next to the equation. 

Many times the students will initiate a competition to see who can finish the puzzle correctly the fastest.  The first time seeing these they can be over whelming because students don't always know where to start.

My suggestion to all of them is pick one piece and work one problem out on that piece, it will lead you to a piece that has new equations to solve for and eventually you will create the puzzle.  If you just keep randomly picking up a piece to solve a puzzle you will end up with lots of buddies but no puzzle. (this is hard for my students to then figure out what to do)


Sunday, November 11, 2012

One-Step Equations

Last week we covered solving one-step equations in my Algebra class.  Here are the pages we created in our Interactive Student Notebook (ISN).


 These are pages 3-4 in our notebooks.  I didn't start the ISN at the beginning of the year so there would have been many more pages before this one.

On the left side is the fold-able I made on the computer and printed off for the students. (template below)

The beginning of the period looked a lot like art class with the kids coloring and cutting it out, but they had an excellent time.

Next, we filled out the fold-able with each type of one-step equation.  It is the kind of problem, not the operation you perform to solve for x.

The top of the flap was completed with the step needed to solve that particular problem, and the base was a worked out sample problem of each kind.

On the right side of the notebook were our notes and practice problems.  At the top, we discussed the vocabulary words: Constant and Coefficient.  A definition and example were given for each word.  You will notice in the problems the students were asked to highlight where/in which problems they saw those vocabulary words.

After each question, we talked about how to substitute each found value back into the equation to determine if they performed the correct operation.

At the very bottom of the right side, I asked students to summarize in 1 sentence how to solve one step equations and what they came up on their own blew my mind..."Perform the opposite operation to solve for x"  **Proud teacher moment**


**UPDATE**
I'm not sure exactly why this post is not letting people download the foldable but below is a link to my Google file for the foldable.

One-Step Equations Foldable

Saturday, November 3, 2012

Interactive Student Notebooks

I first want to say that I am in no way an expert in Interactive Student Notebooks.  My group of Algebra students this year are having a hard time with math, in fact they voiced their hatred of math many times at the beginning of the school year.  After getting to the root of their hatred, I found that it's mainly because all they ever did with their previous teacher was worksheets.

I searched for many weeks to find something that would teach these students how to take notes, keep themselves organized, and most of all have fun while doing it.  Enter in Interactive Student Notebooks!


SETTING UP ISN
  • Composition Notebooks (from what I've read they are the most durable, and it's also hard to rip out pages.  I found these for 93 cents at Target)


This is mine


  • I had my students cover their notebooks in colored paper, and cover it with "Numbers Important to Me".  I have seen some notebooks where they are covered in pictures from magazine.  I like keeping it math related! When they were finished I covered the front and back in clear shipping tape, it helps keep them clean and extra durable.


  •  The first page of the ISN was a grading rubric.  I'm terrible at writing rubrics so I found one online.  You can get a copy of it here.


  • The next two pages became our table of contents.  This will include the topic we covered, what pages it's on in the notebook, and what date we created them on.  


  • The pages after your table of contents are used for notes.  Generally one side of the page (left side) is for the students.  They create fold ables or any sort of discovery activity.  The other side (right side) is for the teachers notes on the topic.  Each page should have a title (the topic) along with page numbers and dates.  
**I will try to post as many of the pages as I can that we have created**

When my students came in and saw the table with the notebooks piled up, the markers, colored paper, glue, scissors, and tape their faces lit up.  They were so excited for class to start and they had no idea what we were even going to do with it all.  To them it simply meant they weren't doing worksheets, and they were happy about that!

Wednesday, October 24, 2012

Sorting Activities

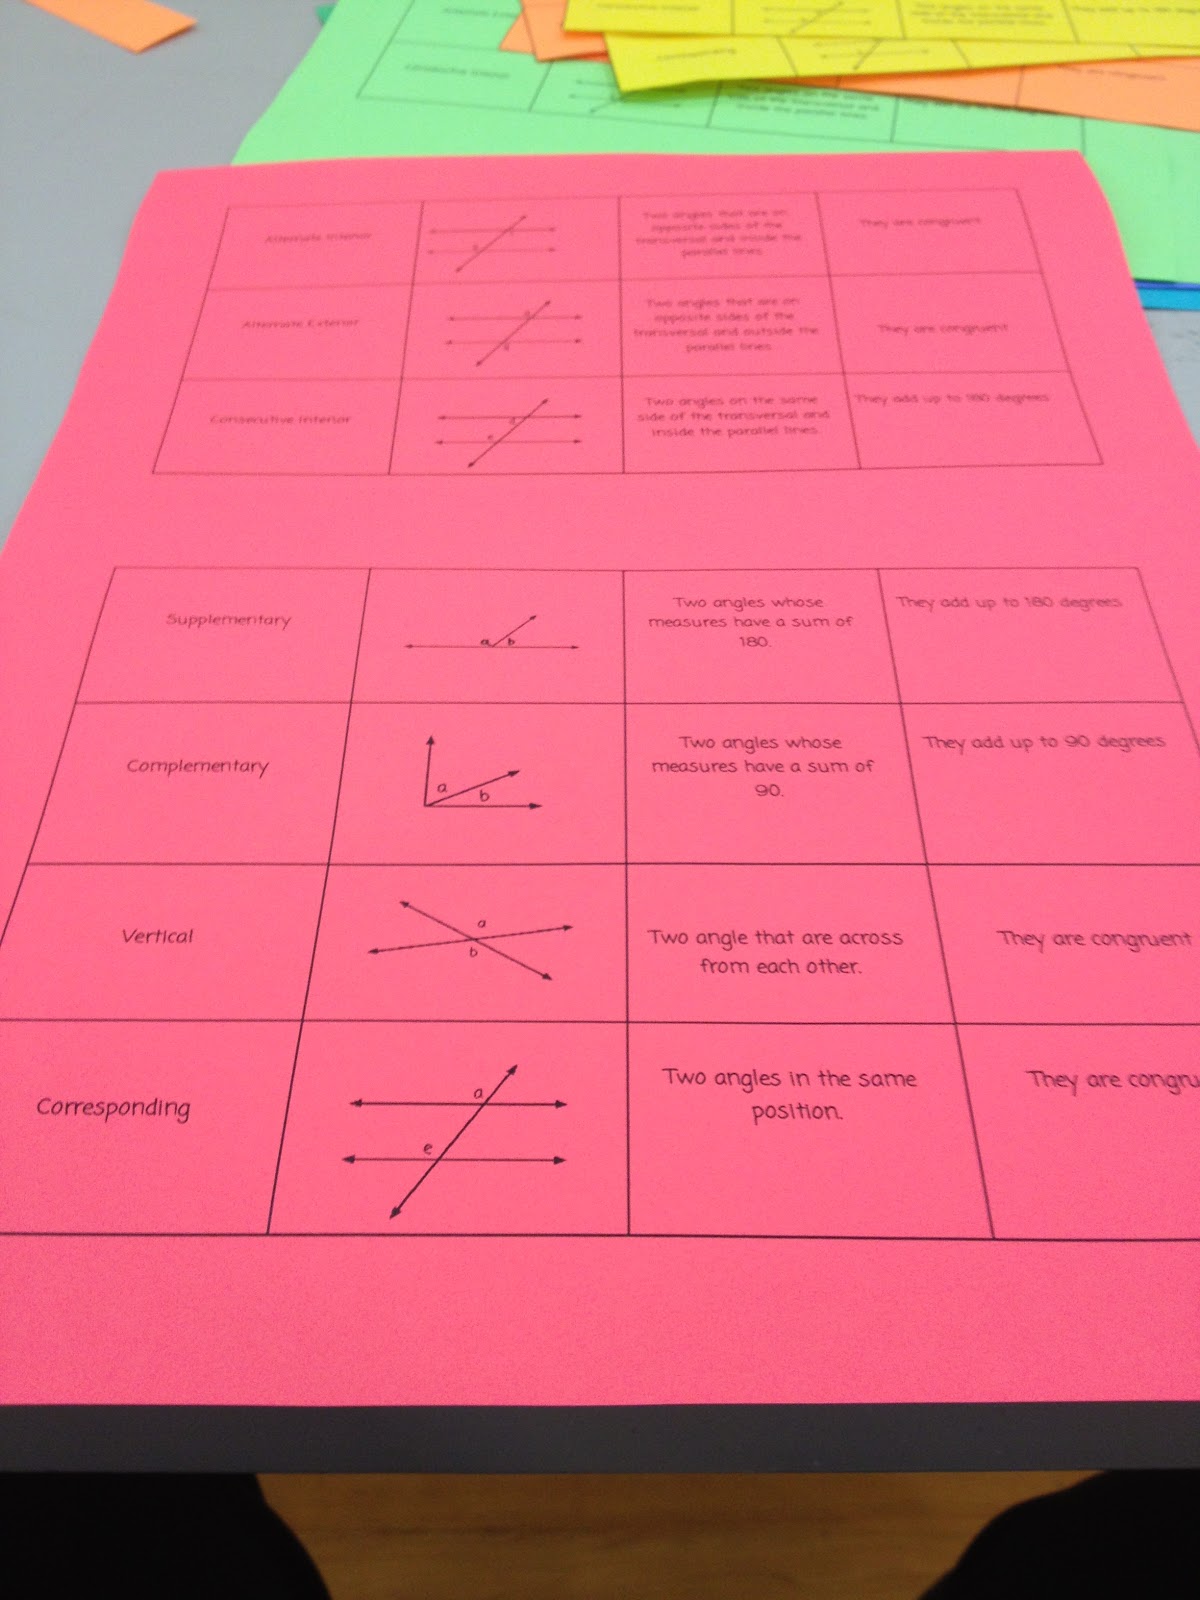
One of my favorite things to have the students do to help them memorize information is to create a sorting activity. I will have them do the sorting activity a few times through out the unit to help them remember the information.

I start off by creating a document with a table.  In this case I created an activity to help my students learn the different angle pairs in Geometry.  One box is the name, another is a picture/example, next is the definition, and the final box is the relationship.

Once I am finished typing it up, I copy it on different colored sheets of paper, cut them up and paper clip them together.  Sometimes I have them laminated so that they can be used over and over again.

The colored paper in my book is a MUST!  Often my students will drop a piece on the floor and when they are colored it's easier to know which clip they belong in.  I use to do them on white paper but would spend a lot of time trying to figure out which clip the dropped piece would belong in.


I have created problem sorts as well where one card had a math problem and the other one had the answer. These were usually like 10 problems long. It allows students to get immediate feedback to see if they are doing it correctly.  They know it was done correctly if they can find their answer, otherwise they know to go back and work it out again.

 Another sort I have made was on the scientific method.   One half of the table was the steps and the other side was a part of a lab write up that I broke down into parts.  The students had to read the part of the lab and determine which step that was. 

Sorts can be used for so many different topics...Parts of a story, Historical Events with their causes and effects, cooking equipment with their names, lab equipment with their names, etc.

If you use sorts please share your ideas!

Saturday, October 20, 2012

Round Robin

I love strategies that allow the students to activity work, get immediate feedback, and give me the opportunity to help my more struggling learners.  One of the greatest strategies is the "Round Robin".

To create a round robin...

I cut in half bright colored sheets of paper, in the example below there were 21 of them all together.  On the first card you write a problem or question you want to students to answer.  On the second card you write your next question, but in the bottom right hand corner you write the answer to the question on the first card.  On your third card you write another question and in the bottom right hand corner of that you write the answer to the second problem.  When you get to your last question the answer to that one goes on the very first card you created.  In the end it makes a giant loop.  I shuffled them up, so they weren't in order, and taped them up around the room.

I did have them laminated so I can use it over and over again.  I'm all about doing something once instead of once every year!

These are all of them!

I put them in order so you could see the format.

Just some tips...

  • Don't have an answer repeat.  It will lead students on a loop that is smaller and they will not get to every problem.
  • Students can start at any problem they want, they will start and end at the same problem if it is done correctly.
  • Write large so that the students can see the answers from across the room. 

The first few times I made one of these I messed it up, so don't worry it gets easier as it goes!

Tuesday, October 16, 2012

Vocab Wall

Vocabulary is something that I feel is extremely important for every class a student is in, but especially when it comes to math and science.  I try very hard to stress with my students that by learning the vocabulary for each unit it will not only help them understand the content at a much deeper level but often learning the vocabulary helps teach the content.

I've always taught vocabulary words at the beginning of each unit using various strategies but felt as though after we were done they just forgot about them.  Often I would mention or bring up a word in class and get the deer in the headlights look.  After either having to remind them what the word was, or the one student out there that remembered would tell everyone else, they would say "Oh yeah, I remember" and then forget again tomorrow when I ask.

I decided that if I was going to take as much time as I was teaching the vocabulary, I would have to find a way to make them stick.  A word wall was one of the many ways I would help make those important words stick.

My word wall for Mapping Unit
The words were created in Google Drawing.  I inserted word art, typed in the word, adjusted it to fit the whole page, and then selected a cool font.  Each one was printed off, colored, cut out and pasted onto a bright colored sheets of paper.  

Each of my units are broken up into objectives and each objective has multiple learning targets.  I have vocabulary words for each of my objectives, as to not over load students with to many words at one time.  So to keep the words organized I colored the vocabulary words for each objective in different colors, blue was objective #1 and purple was objective #2, but all on the same colored paper.  

Since my vocabulary words for each unit do not change from one year to the next I had them laminated so that they could be used over and over again.  Sometimes I write on them with either a drawing or a memory hook, using a white board marker (they easily clean right off).  

The vocabulary words are now always present each day and I force my students to use them in their work or when giving an answer in class.  I have found that by just making them present every day that they use and remember them.

Saturday, October 6, 2012

Document Camera

I am obsessed with technology and I love it even more when something can be used for multiple purposes.  To me it makes owning that one item even better.  So recently I have been reading about how you can use your iPad as a document camera (an Elmo).  After reading this I knew right away it was something I absolutely had to figure out.  The next day I went into work set on figuring this out.  My students spent most of the day laughing at me, and checking up on me, because they know that when I set my mind to something I will make it work!  By the end of the day I had not only created a stand for it but got it working.  To bad that in the afternoon I don't have classes anymore (plan period and tech coach) and so I couldn't use it.

The next day the kids came in to see it all set up and working!  They were pretty excited about it because they know that I'll let them use it.  Using technology in my classroom has really changed their opinion about being in school, for the better.  My students are more engaged in my lessons and the amount of participation has also greatly increased.

Here is how I did it...

These are the supplies that you will need.
Stand, clamp, clip board, iPad, iPad VGA connector

1st: Attach the clamp to the stand.  The stand was already in my room and there was a ring on it, which will hold the iPad, but I didn't want to place an expensive piece of equipment on just a ring.  Also with the ring it limited the amount of space for my document before having to have it sit on the bottom of the stand.  This does not work for me when I have to write on the document.

The clam is upside down because then the clipboard
tilts up instead of downward in the front.
 2nd: Add the clipboard and tighten everything!


3rd: Place the iPad on the clipboard.  It will need to hand off slightly because you need to use the camera lens on the bottom of the iPad. (I have a cover, the one on the desk, that I leave on it so it helps prevent sliding, you just have to make sure the lens is not covered.)


4th: Check underneath to make sure the lens is not being covered and it's just slightly over the edge. With the iPad being on the clipboard it pushes where your document would have to be on the table away from the stand. This is better if you plan on writing on your documents.


5th: Connect your VGA adapter to the iPad and attach your projector cord.  The connector can be easily disconnected so make sure your cords are loose.  Also the way I have it set up, the clip on the clipboard actually helps hold it in place. (The cord is not clipped, it's just sitting on top)


 6th: Turn the iPad on and make sure that it recognizes the direction you are in and it's not backwards or to the side.  Then go to Settings and click on General.  Select "Lock Rotation" so that when you are using it during class it doesn't keep rotating on you.  Exit back out to the home screen and click on camera and you're read to go.


That's it!

Now after setting all of this up and using it with my classes I wondered...Would it work with my iPhone?  So I disconnected the iPad and plugged in my iPhone.  Guess what??  IT WORKS!! Granted the screen that is projected is not a big as it is with the iPad and you have the picture option bars on your screen, but it WORKS!!

So if you can't afford an iPad but have an iPhone all you need to do is get a VGA adapter (which you can get anywhere, I got mine at Target) and you have yourself a document camera.

If you make your iPad into a document camera, let me know how it works out for you.


Tuesday, October 2, 2012

Drawing on the Windows

So we have been in school since the middle of August and every day I'm trying to find new ways to keep my students engaged.  The other day I decided that instead of using the whiteboards or the SMART board I would use the 6 giant windows that I have in my classroom.

My Geometry class is currently working on solving for the missing angles using our awesome Algebra skills! We are focusing on complementary and supplementary angles.

I drew six different problems ranging in difficulty level as you move down the line of windows. Immediately when my students came in the door they saw the drawings on the windows...How I don't know cause they are hard to see until till you get up close.  They had a great time solving each of the problems and asked if they could draw on the windows too.  I decided to have them come up with their own problems and work them out, just to make sure they worked out in the end.  I wanted them to create problems where none of the angles were given, and where each angle contained variables.  This way they had to solve for the missing variable first and then plug it in to find the measure of each angle.

Many of them complained at first saying "This is to hard" but after a few minutes they began to make a game out of it, seeing who could come up with the hardest problem. It took many of them about 15 minutes to come up with their own, but they were excellent problems and they were proud of themselves.  So after checking each of their problems I let them draw them up on the windows. (You can see two of their examples below).

It's a little hard to see but the problem is 5x +4, x-2, and 3x +7.  Courtesy of a student.

Sorry for the store shed being in the way but this problem was 3x, 4x, and 3x.  Again courtesy of a student.


It was probably one of the best days in class that we have had in about a week and as the day went on other classes were upset that they didn't get to do math on the windows.

All that we used were Expo dry eraser markers to draw on the windows, and they easily come off with a rag.  If it gets dry, like mine did because it sat over night, a little windex takes them write off.

Sunday, September 30, 2012

Things about Myself

It's all about me...


  • I went to college planning to be a Forensic Chemistry major and ended up becoming a Special Education Teacher.
  • I have been teaching LD students at the same school in Illinois for the past 6 years.
  • Currently teaching Math and Science classes, oh yeah and Computer Applications (for General Education Students).
  • I have some of the best co-workers a person could ask for.
  • I love teaching and finding new ways to help my students learn.     
  • I'm focusing on making my subject areas relevant to my students so they see the purpose.  
  • I make my own jewelry.
  • I'm in LOVE with Target.  There is no better store in my book!
  • I have a crazy mutt named Emma.
  • Flea Markets are some of the greatest places on Earth.  I don't always buy something (mainly cause I'm broke), but I always find something I want to take home with me.
  • My best friends are both pregnant and they are having their babies only 1 day apart.
Related Posts Plugin for WordPress, Blogger...