Wednesday, October 24, 2012

Sorting Activities

One of my favorite things to have the students do to help them memorize information is to create a sorting activity. I will have them do the sorting activity a few times through out the unit to help them remember the information.

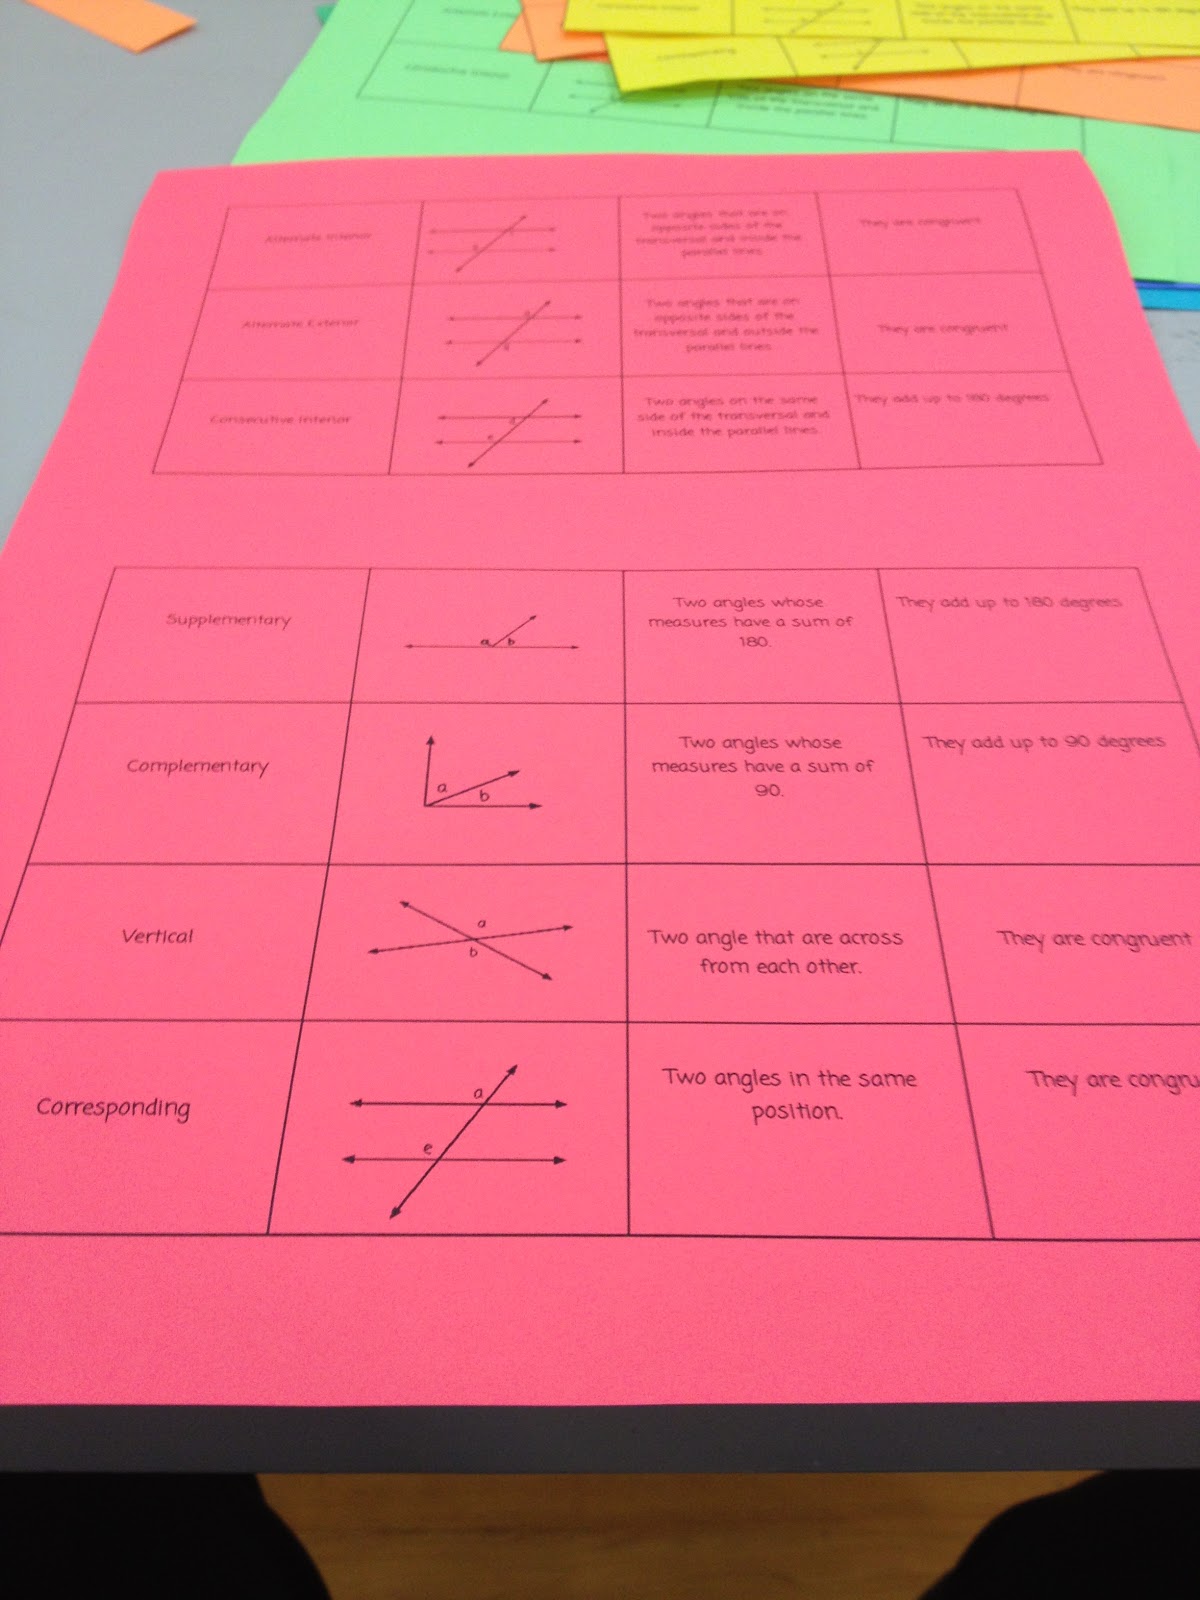
I start off by creating a document with a table.  In this case I created an activity to help my students learn the different angle pairs in Geometry.  One box is the name, another is a picture/example, next is the definition, and the final box is the relationship.

Once I am finished typing it up, I copy it on different colored sheets of paper, cut them up and paper clip them together.  Sometimes I have them laminated so that they can be used over and over again.

The colored paper in my book is a MUST!  Often my students will drop a piece on the floor and when they are colored it's easier to know which clip they belong in.  I use to do them on white paper but would spend a lot of time trying to figure out which clip the dropped piece would belong in.


I have created problem sorts as well where one card had a math problem and the other one had the answer. These were usually like 10 problems long. It allows students to get immediate feedback to see if they are doing it correctly.  They know it was done correctly if they can find their answer, otherwise they know to go back and work it out again.

 Another sort I have made was on the scientific method.   One half of the table was the steps and the other side was a part of a lab write up that I broke down into parts.  The students had to read the part of the lab and determine which step that was. 

Sorts can be used for so many different topics...Parts of a story, Historical Events with their causes and effects, cooking equipment with their names, lab equipment with their names, etc.

If you use sorts please share your ideas!

Saturday, October 20, 2012

Round Robin

I love strategies that allow the students to activity work, get immediate feedback, and give me the opportunity to help my more struggling learners.  One of the greatest strategies is the "Round Robin".

To create a round robin...

I cut in half bright colored sheets of paper, in the example below there were 21 of them all together.  On the first card you write a problem or question you want to students to answer.  On the second card you write your next question, but in the bottom right hand corner you write the answer to the question on the first card.  On your third card you write another question and in the bottom right hand corner of that you write the answer to the second problem.  When you get to your last question the answer to that one goes on the very first card you created.  In the end it makes a giant loop.  I shuffled them up, so they weren't in order, and taped them up around the room.

I did have them laminated so I can use it over and over again.  I'm all about doing something once instead of once every year!

These are all of them!

I put them in order so you could see the format.

Just some tips...

  • Don't have an answer repeat.  It will lead students on a loop that is smaller and they will not get to every problem.
  • Students can start at any problem they want, they will start and end at the same problem if it is done correctly.
  • Write large so that the students can see the answers from across the room. 

The first few times I made one of these I messed it up, so don't worry it gets easier as it goes!

Tuesday, October 16, 2012

Vocab Wall

Vocabulary is something that I feel is extremely important for every class a student is in, but especially when it comes to math and science.  I try very hard to stress with my students that by learning the vocabulary for each unit it will not only help them understand the content at a much deeper level but often learning the vocabulary helps teach the content.

I've always taught vocabulary words at the beginning of each unit using various strategies but felt as though after we were done they just forgot about them.  Often I would mention or bring up a word in class and get the deer in the headlights look.  After either having to remind them what the word was, or the one student out there that remembered would tell everyone else, they would say "Oh yeah, I remember" and then forget again tomorrow when I ask.

I decided that if I was going to take as much time as I was teaching the vocabulary, I would have to find a way to make them stick.  A word wall was one of the many ways I would help make those important words stick.

My word wall for Mapping Unit
The words were created in Google Drawing.  I inserted word art, typed in the word, adjusted it to fit the whole page, and then selected a cool font.  Each one was printed off, colored, cut out and pasted onto a bright colored sheets of paper.  

Each of my units are broken up into objectives and each objective has multiple learning targets.  I have vocabulary words for each of my objectives, as to not over load students with to many words at one time.  So to keep the words organized I colored the vocabulary words for each objective in different colors, blue was objective #1 and purple was objective #2, but all on the same colored paper.  

Since my vocabulary words for each unit do not change from one year to the next I had them laminated so that they could be used over and over again.  Sometimes I write on them with either a drawing or a memory hook, using a white board marker (they easily clean right off).  

The vocabulary words are now always present each day and I force my students to use them in their work or when giving an answer in class.  I have found that by just making them present every day that they use and remember them.

Saturday, October 6, 2012

Document Camera

I am obsessed with technology and I love it even more when something can be used for multiple purposes.  To me it makes owning that one item even better.  So recently I have been reading about how you can use your iPad as a document camera (an Elmo).  After reading this I knew right away it was something I absolutely had to figure out.  The next day I went into work set on figuring this out.  My students spent most of the day laughing at me, and checking up on me, because they know that when I set my mind to something I will make it work!  By the end of the day I had not only created a stand for it but got it working.  To bad that in the afternoon I don't have classes anymore (plan period and tech coach) and so I couldn't use it.

The next day the kids came in to see it all set up and working!  They were pretty excited about it because they know that I'll let them use it.  Using technology in my classroom has really changed their opinion about being in school, for the better.  My students are more engaged in my lessons and the amount of participation has also greatly increased.

Here is how I did it...

These are the supplies that you will need.
Stand, clamp, clip board, iPad, iPad VGA connector

1st: Attach the clamp to the stand.  The stand was already in my room and there was a ring on it, which will hold the iPad, but I didn't want to place an expensive piece of equipment on just a ring.  Also with the ring it limited the amount of space for my document before having to have it sit on the bottom of the stand.  This does not work for me when I have to write on the document.

The clam is upside down because then the clipboard
tilts up instead of downward in the front.
 2nd: Add the clipboard and tighten everything!


3rd: Place the iPad on the clipboard.  It will need to hand off slightly because you need to use the camera lens on the bottom of the iPad. (I have a cover, the one on the desk, that I leave on it so it helps prevent sliding, you just have to make sure the lens is not covered.)


4th: Check underneath to make sure the lens is not being covered and it's just slightly over the edge. With the iPad being on the clipboard it pushes where your document would have to be on the table away from the stand. This is better if you plan on writing on your documents.


5th: Connect your VGA adapter to the iPad and attach your projector cord.  The connector can be easily disconnected so make sure your cords are loose.  Also the way I have it set up, the clip on the clipboard actually helps hold it in place. (The cord is not clipped, it's just sitting on top)


 6th: Turn the iPad on and make sure that it recognizes the direction you are in and it's not backwards or to the side.  Then go to Settings and click on General.  Select "Lock Rotation" so that when you are using it during class it doesn't keep rotating on you.  Exit back out to the home screen and click on camera and you're read to go.


That's it!

Now after setting all of this up and using it with my classes I wondered...Would it work with my iPhone?  So I disconnected the iPad and plugged in my iPhone.  Guess what??  IT WORKS!! Granted the screen that is projected is not a big as it is with the iPad and you have the picture option bars on your screen, but it WORKS!!

So if you can't afford an iPad but have an iPhone all you need to do is get a VGA adapter (which you can get anywhere, I got mine at Target) and you have yourself a document camera.

If you make your iPad into a document camera, let me know how it works out for you.


Tuesday, October 2, 2012

Drawing on the Windows

So we have been in school since the middle of August and every day I'm trying to find new ways to keep my students engaged.  The other day I decided that instead of using the whiteboards or the SMART board I would use the 6 giant windows that I have in my classroom.

My Geometry class is currently working on solving for the missing angles using our awesome Algebra skills! We are focusing on complementary and supplementary angles.

I drew six different problems ranging in difficulty level as you move down the line of windows. Immediately when my students came in the door they saw the drawings on the windows...How I don't know cause they are hard to see until till you get up close.  They had a great time solving each of the problems and asked if they could draw on the windows too.  I decided to have them come up with their own problems and work them out, just to make sure they worked out in the end.  I wanted them to create problems where none of the angles were given, and where each angle contained variables.  This way they had to solve for the missing variable first and then plug it in to find the measure of each angle.

Many of them complained at first saying "This is to hard" but after a few minutes they began to make a game out of it, seeing who could come up with the hardest problem. It took many of them about 15 minutes to come up with their own, but they were excellent problems and they were proud of themselves.  So after checking each of their problems I let them draw them up on the windows. (You can see two of their examples below).

It's a little hard to see but the problem is 5x +4, x-2, and 3x +7.  Courtesy of a student.

Sorry for the store shed being in the way but this problem was 3x, 4x, and 3x.  Again courtesy of a student.


It was probably one of the best days in class that we have had in about a week and as the day went on other classes were upset that they didn't get to do math on the windows.

All that we used were Expo dry eraser markers to draw on the windows, and they easily come off with a rag.  If it gets dry, like mine did because it sat over night, a little windex takes them write off.

Related Posts Plugin for WordPress, Blogger...